分片集群机制及原理讲解
2022-08-31
为什么使用分片集群
·数据容量日益增大,访问性能日渐降低,怎么破?
·新品上线异常火爆,如何支撑更多的并发用户?
·单库已有 10TB 数据,恢复需要 1-2 天,如何加速?
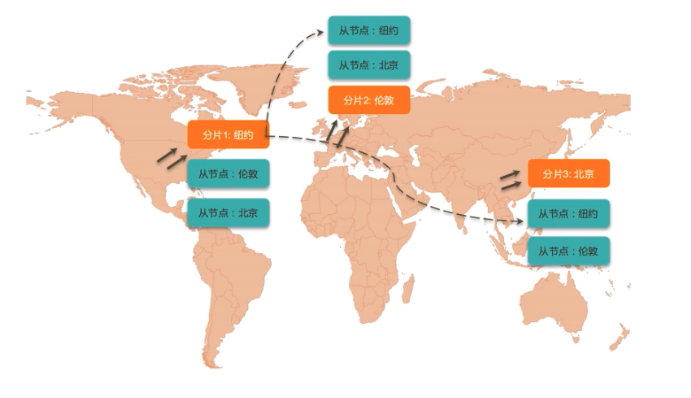
·地理分布数据
如何解决以上问题
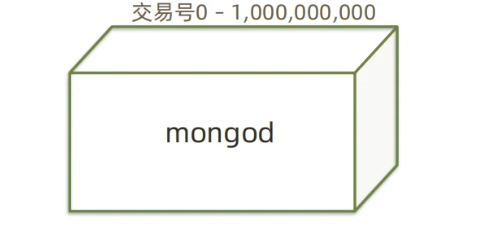
原始结构
·银行交易单表内 10 亿笔资料
·超负荷运转
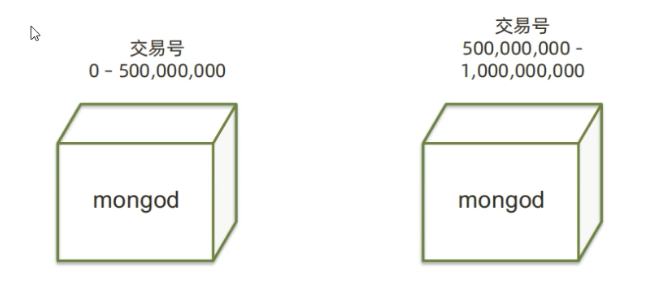
把数据 分成两半
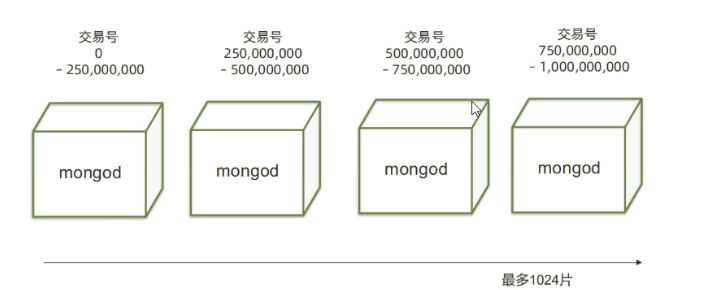
把数据分成4个部分
分片架构(mongodb sharding cluster MSC)介绍
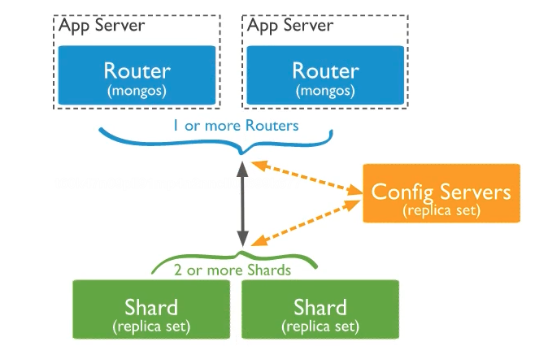
· Mongos 路由节点
提供集群单一入口
转发应用端请求
选择合适数据节点进行读写
合并多个数据节点的返回
无状态
建议至少 2 个
单独,可以部署多台

· Config Serversi 配置节点
提供集群元数据存储
分片数据分布的映射
集群拓扑
pss 结构

· shards 数据节点
以复制集为单位
横向扩展
最大 1024 分片
分片之间数据不重复
所有分片在一起才可
完整工作
存储数据
pss 结构
MongoDB 分片集群特点
·应用全透明,无特殊处理
·数据自动均衡		# 增加新节点会自动均衡;
·动态扩容,无须下线
·提供三种分片方式
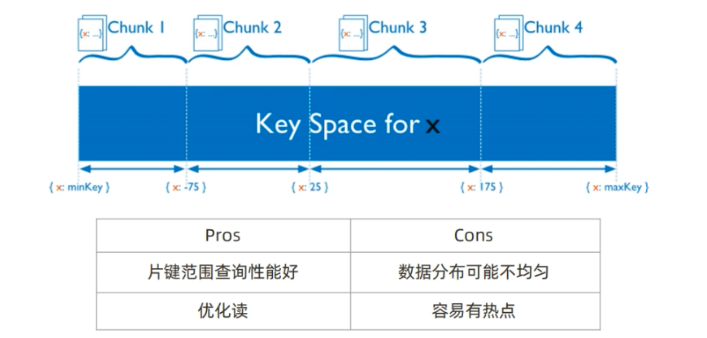
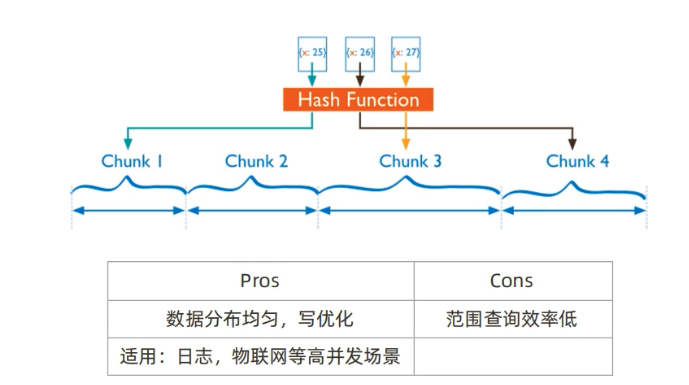
分片集群数据分布方式
·基于范围
·基于 Hash
·基于 zone/tag
分片集群数据分布方式-基于范围
分片集群数据分布方式-基于哈希
分片集群数据分布方式-自定义zone
分片集群搭建及扩容
1.分片规划
10个实例:38017-38026
1.configserver:
    3台构成的复制集(1主2从,不支持arbiter)38018-38020

2.shard 节点
    sh1:38021-23		(1主2从,其中一个节点为arbiter,如知己名字 sh1)
    sh2:38024-26		(1主2从,其中一个节点为arbiter,复制集名字 sh2)

3. mongos
    38017
2.配置过程
a. shard 复制集节点配置
1.创建目录
mkdir -p /mongodb/{38021..38026}/{data,log}

2. 配置文件
sh1:
cat > /mongodb/38021/mongod.conf << EOF
# for documentation of all options, see:
#   http://docs.mongodb.org/manual/reference/configuration-options/

# where to write logging data.
systemLog:
  destination: file
  logAppend: true
  path: /mongodb/38021/log/mongodb.log

# Where and how to store data.
storage:
  journal:
    enabled: true
  dbPath: /mongodb/38021/data
  directoryPerDB: true
  #engine: wiredTiger
  wiredTiger:
    engineConfig:
      cacheSizeGB: 1
      directoryForIndexes: true
    collectionConfig:
      blockCompressor: zlib
    indexConfig:
      prefixCompression: true

# how the process runs
processManagement:
  fork: true  # fork and run in background
  timeZoneInfo: /usr/share/zoneinfo

# network interfaces
net:
  port: 38021
  bindIp: 0.0.0.0,::  # Enter 0.0.0.0,:: to bind to all IPv4 and IPv6 addresses or, alternatively, use the net.bindIpAll setting.

#security:

#operationProfiling:

replication:
  oplogSizeMB: 2048
  replSetName: sh1

sharding:
  clusterRole: shardsvr		# 固定写法,shard

## Enterprise-Only Options

#auditLog:
EOF

=========
cp /mongodb/38021/mongod.conf /mongodb/38022/
cp /mongodb/38021/mongod.conf /mongodb/38023/

sed -i 's#38021#38022#g' /mongodb/38022/mongod.conf
sed -i 's#38021#38023#g' /mongodb/38023/mongod.conf


sh2:
cat > /mongodb/38024/mongod.conf << EOF
# for documentation of all options, see:
#   http://docs.mongodb.org/manual/reference/configuration-options/

# where to write logging data.
systemLog:
  destination: file
  logAppend: true
  path: /mongodb/38024/log/mongodb.log

# Where and how to store data.
storage:
  journal:
    enabled: true
  dbPath: /mongodb/38024/data
  directoryPerDB: true
  #engine: wiredTiger
  wiredTiger:
    engineConfig:
      cacheSizeGB: 1
      directoryForIndexes: true
    collectionConfig:
      blockCompressor: zlib
    indexConfig:
      prefixCompression: true

# how the process runs
processManagement:
  fork: true  # fork and run in background
  timeZoneInfo: /usr/share/zoneinfo

# network interfaces
net:
  port: 38024
  bindIp: 0.0.0.0  # Enter 0.0.0.0,:: to bind to all IPv4 and IPv6 addresses or, alternatively, use the net.bindIpAll setting.

#security:

#operationProfiling:

replication:
  oplogSizeMB: 2048
  replSetName: sh2

sharding:
  clusterRole: shardsvr			# 固定写法,shard

## Enterprise-Only Options

#auditLog:
EOF

=========
\cp /mongodb/38024/mongod.conf /mongodb/38025/
\cp /mongodb/38024/mongod.conf /mongodb/38026/

sed -i 's#38024#38025#g' /mongodb/38025/mongod.conf
sed -i 's#38024#38026#g' /mongodb/38026/mongod.conf


3. 所有节点搭建,并配置集群;
mongod -f /mongodb/38021/mongod.conf
mongod -f /mongodb/38022/mongod.conf
mongod -f /mongodb/38023/mongod.conf
mongod -f /mongodb/38024/mongod.conf
mongod -f /mongodb/38025/mongod.conf
mongod -f /mongodb/38026/mongod.conf


==============================
mongo --port 38021
use admin
config = {_id: "sh1", members: [
                                    {_id: 0, host: '172.16.40.143:38021'},
                                    {_id: 1, host: '172.16.40.143:38022'},
                                    {_id: 2, host: '172.16.40.143:38023',"arbiterOnly": true}
]}

rs.initiate(config)

----
mongo --port 38024
use admin
config = {_id: "sh2", members: [
                                    {_id: 0, host: '172.16.40.143:38024'},
                                    {_id: 1, host: '172.16.40.143:38025'},
                                    {_id: 2, host: '172.16.40.143:38026',"arbiterOnly": true}
]}

rs.initiate(config)

=================================

b.config 节点配置
    config 是存放集群中的元数据
    config 集群必须是 PSS
    config 服务器不需要太高配置,基本配置就够用,比如8c16G
1.目录配置
mkdir -p /mongodb/{38018..38020}/{data,log}

2. 修改配置文件
=============================
cat > /mongodb/38018/mongod.conf << EOF
# for documentation of all options, see:
#   http://docs.mongodb.org/manual/reference/configuration-options/

# where to write logging data.
systemLog:
  destination: file
  logAppend: true
  path: /mongodb/38018/log/mongodb.log

# Where and how to store data.
storage:
  journal:
    enabled: true
  dbPath: /mongodb/38018/data
  directoryPerDB: true
  #engine: wiredTiger
  wiredTiger:
    engineConfig:
      cacheSizeGB: 1
      directoryForIndexes: true
    collectionConfig:
      blockCompressor: zlib
    indexConfig:
      prefixCompression: true

# how the process runs
processManagement:
  fork: true  # fork and run in background
  timeZoneInfo: /usr/share/zoneinfo

# network interfaces
net:
  port: 38018
  bindIp: 0.0.0.0  # Enter 0.0.0.0,:: to bind to all IPv4 and IPv6 addresses or, alternatively, use the net.bindIpAll setting.

#security:

#operationProfiling:

replication:
  oplogSizeMB: 2048
  replSetName: configReplSet    # 复制集的名字自己随便起,

sharding:
  clusterRole: configsvr     # 固定写法,shard固定写法,config 必须写 configsvr

## Enterprise-Only Options

#auditLog:
EOF
================

cp /mongodb/38018/mongod.conf /mongodb/38019/
cp /mongodb/38018/mongod.conf /mongodb/38020/

sed -i 's#38018#38019#g' /mongodb/38019/mongod.conf
sed -i 's#38018#38020#g' /mongodb/38020/mongod.conf


3. 启动节点并配置复制集
mongod -f /mongodb/38018/mongod.conf
mongod -f /mongodb/38019/mongod.conf
mongod -f /mongodb/38020/mongod.conf

mongo --port 38018
use admin
config = {_id: "configReplSet", members: [
                                    {_id: 0, host: '172.16.40.143:38018'},
                                    {_id: 1, host: '172.16.40.143:38019'},
                                    {_id: 2, host: '172.16.40.143:38020'}
]}

rs.initiate(config)
=======================
注:configserver 可以是一个节点,官方建议复制集。configserver 不能有 arbiter。
新版本中,要求必须是复制集。
注:mongodb3.4 之后,虽然要求 config server 为 replica set,但是不支持 arbiter
=======================

c. mongos节点配置
1.创建目录
mkdir -p /mongodb/38017/{data,log}

2.配置文件
=====================
cat > /mongodb/38017/mongod.conf << EOF
# for documentation of all options, see:
#   http://docs.mongodb.org/manual/reference/configuration-options/

# where to write logging data.
systemLog:
  destination: file
  logAppend: true
  path: /mongodb/38017/log/mongodb.log

# how the process runs
processManagement:
  fork: true  # fork and run in background
  timeZoneInfo: /usr/share/zoneinfo

# network interfaces
net:
  port: 38017
  bindIp: 0.0.0.0  # Enter 0.0.0.0,:: to bind to all IPv4 and IPv6 addresses or, alternatively, use the net.bindIpAll setting.

#security:

#operationProfiling:

sharding:
  # 需要指定configserver 的地址,configserver 中配置了源数据;
  configDB: configReplSet/172.16.40.143:38018,172.16.40.143:38019,172.16.40.143:38020

## Enterprise-Only Options

#auditLog:
EOF
======================

3. 启动mongos
    注意:这里启动的命令是mongos
mongos -f /mongodb/38017/mongod.conf


#########
d. 分片集群操作
    因为在集群创建之初,mongos已经知道谁是configserver,但是不知道谁是sharding,所以在这里,我们手动添加sharding集群;

1.连接到其中一个mongos,做以下配置
mongo 172.16.40.143:38017/admin


2.添加分片
db.runCommand({ addshard:
"sh1/172.16.40.143:38021,172.16.40.143:38022,172.16.40.143:38023", name: "shard1"})

db.runCommand({ addshard:
"sh2/172.16.40.143:38024,172.16.40.143:38025,172.16.40.143:38026", name: "shard2"})


3. 列出分片
db.runCommand({listshards:1})

4. 整体状态查看
sh.status()
=========================


e. 使用分片集群
3. 分片集群的使用
集群分片策略:
- RANGE
- HASH
- ZONE
RANGE:mongo会自动选择一个主分片,在该分片上生成chunk(最小的存储单元,最小默认64m可以修改;);起初数据都是存放在mongo一个节点上(在节点能力范围之内,单个chunk满了会自动分裂成两个,每个都会存放之前chunk的部分数据;);mongos会定时监测所有shard(节点)上的数据是否均匀;如果发现不均匀,在集群不忙的时候会触发 balance,将数据均匀的分布到各个shard(节点)上;


HASH:起初会拿id做hash运算;如果配置了hash存储,会在每个shard上预生成一些chunk;然后根据数据生成的hash值去决定存放到哪里;数据的存放是均匀的;

ZONE:zone也会预生成chunk在各个shard上;

如果不做分片策略,集群也会去自动的去均衡分片;